If you’ve signed up to Protolyst to support your academic reading, here’s a workflow to get you started!
We’ve organised this guide into different sections based on your experience with digital notetaking apps and connected notes:
- Beginner – if this is your first time using a connected note-taking app
- Intermediate – if you’re familiar with notetaking, having used apps like Notion, EverNote, OneNote and are ready to use more features of Protolyst
Academic Reading Workflow – Beginner #
As a researcher, you’ll read a huge number of papers. So many that it can be hard to remember WHERE you read about a new characterisation method, an interesting system behaviour or to refind a partly remembered quote you want to use.
On Protolyst your highlights are lifted out the page as Atoms, so any details that caught your eye while reading are saved outside of the PDF. So that method, behaviour or quote is just a quick search away!
This 4 step workflow will get you familiar with using Protolyst to read your papers, collect your highlights and capture your ideas and annotations.
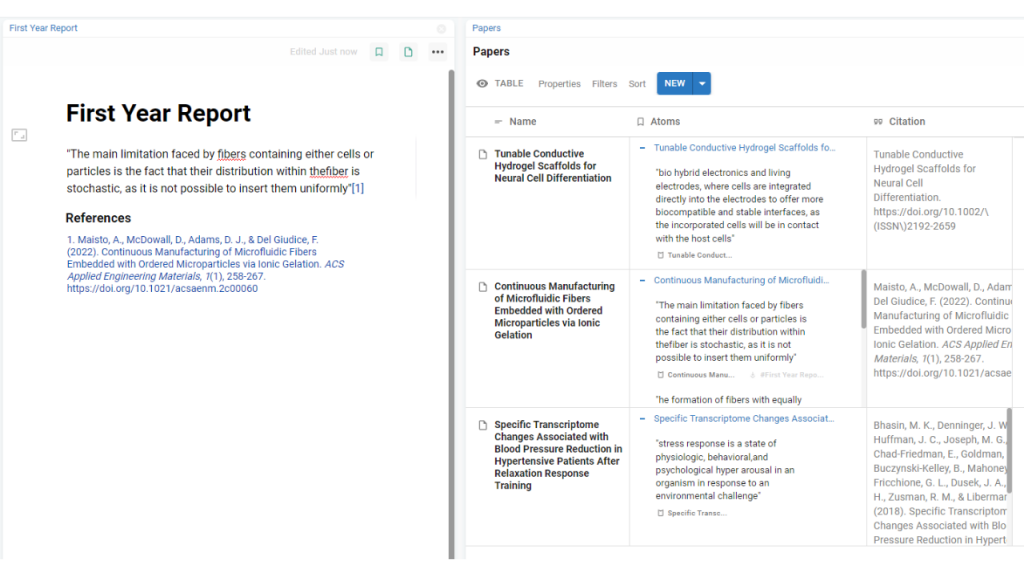
1. Add a Table to your Workspace
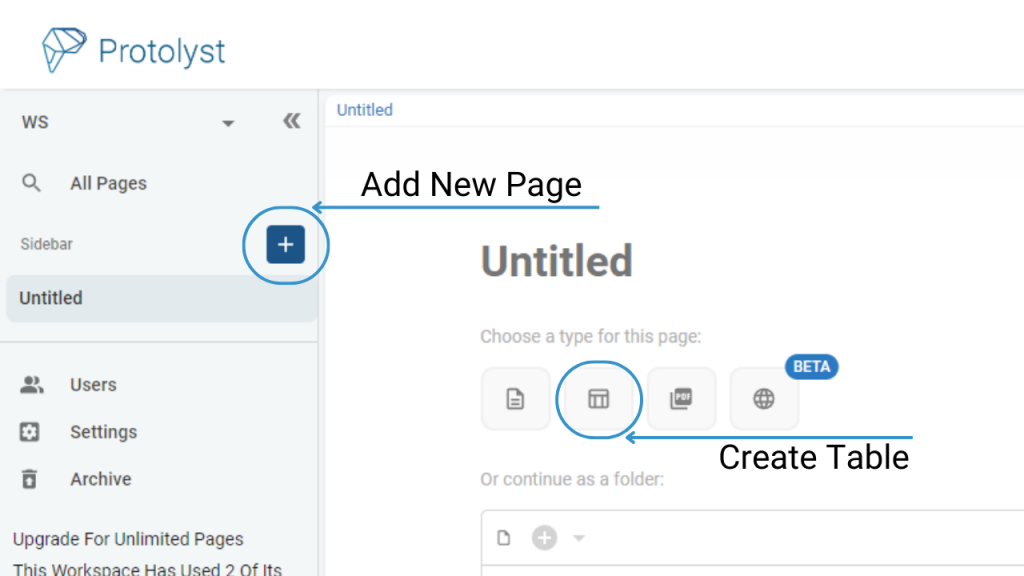
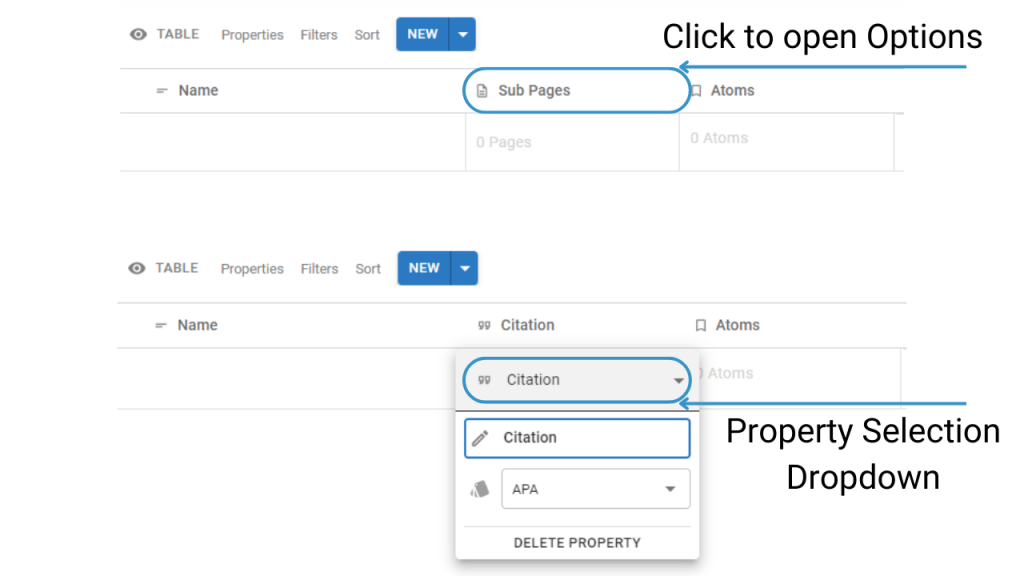
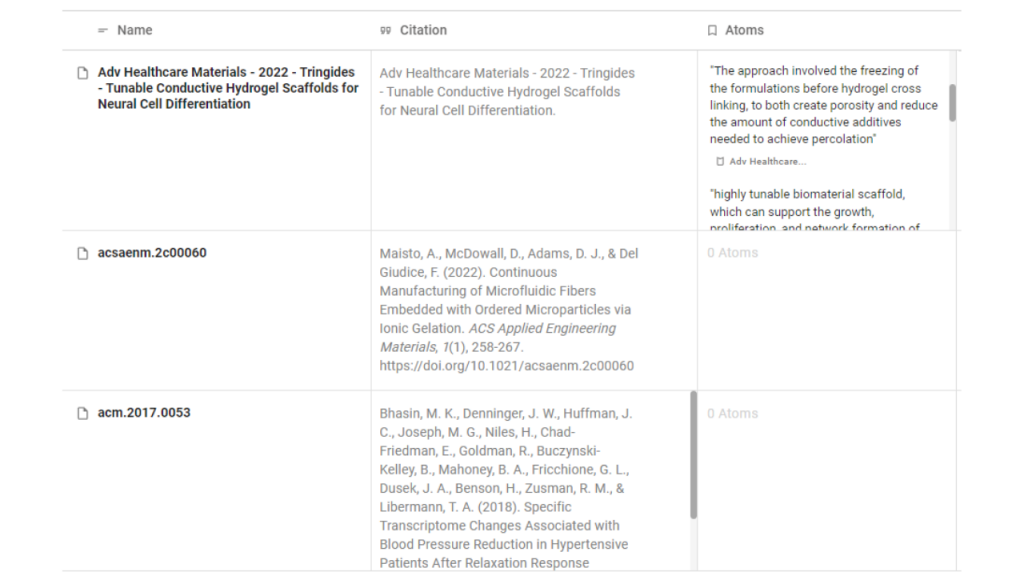
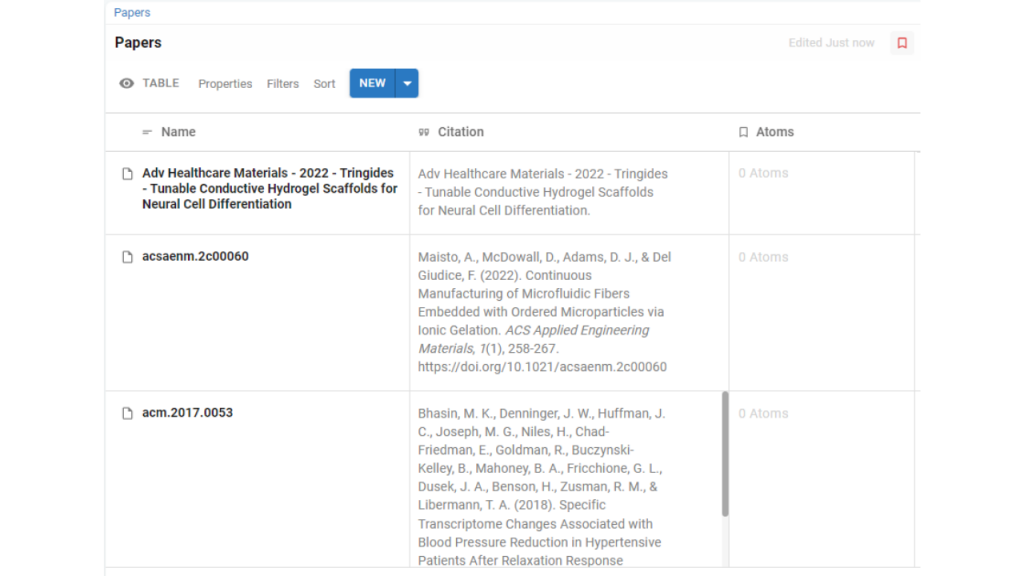
Tables have 2 properties by default – Atoms (which will display the highlights you save as Atoms) and Sub-Pages. For this flow let’s change the Sub-Pages property to a Citation Property.
Citations are automatically generated here for each paper you upload into a Table. (More on Citations below!)

2. Upload a Paper
You can upload Papers by using the New Button above the Table. The Dropdown arrow will give you a list of Page Types to choose From. Select File to choose a File to upload to Protolyst.
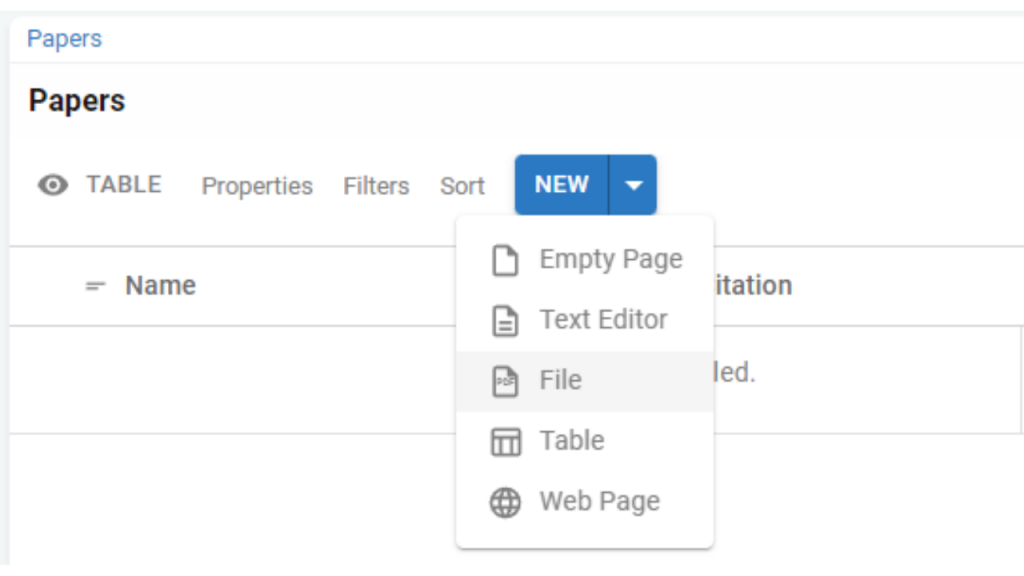
You can also batch upload files into your Table by Drag and Drop. Select the Files you want to upload and drag them onto your Table.
3. Capture Highlights while Reading
Highlight interesting text and hit ‘Capture Atom’. This saves your highlighted text as an Atom. Atoms are searchable (and viewable) without you needing to have the PDF open. (For more on what you can do with Atoms, take a look at the Beginner Plus info below)
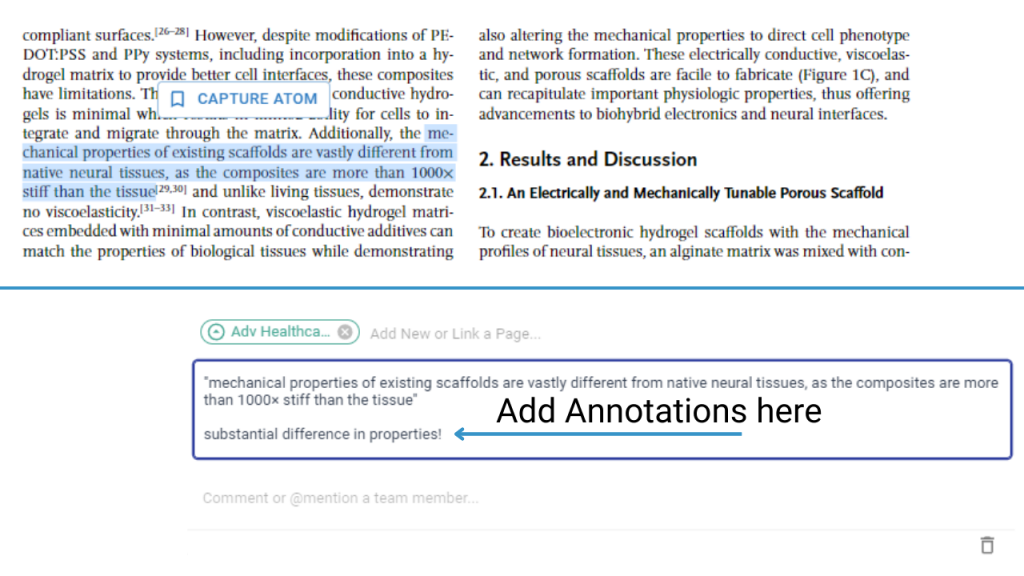
When you Capture an Atom, a text box appears. You can type to add your annotations in here, so if there are any ideas or further thoughts you want to add, just pop them in.
4. Return to your Table
All the highlights you have captured as Atoms are visible in the Atoms Column of your Papers table
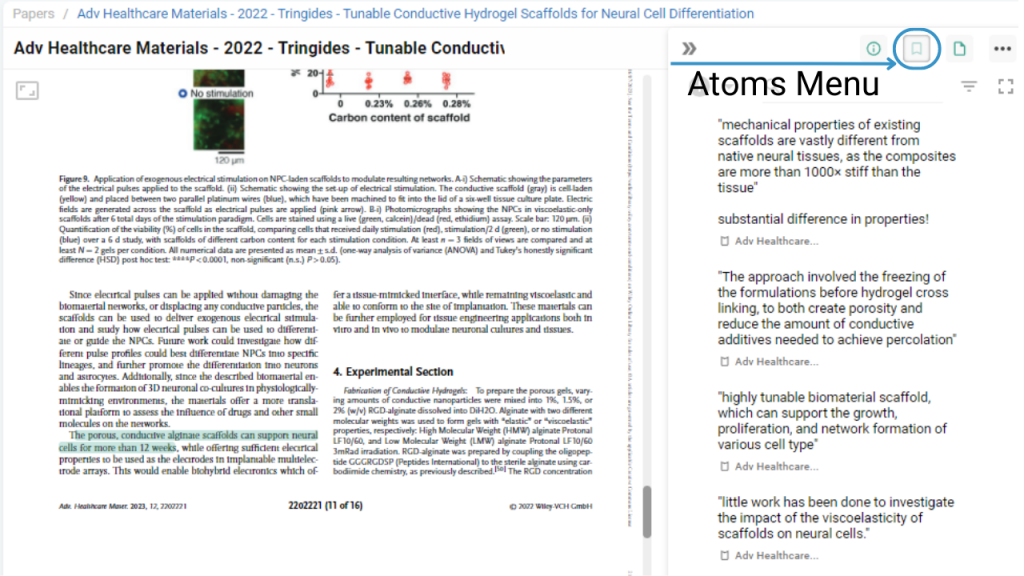
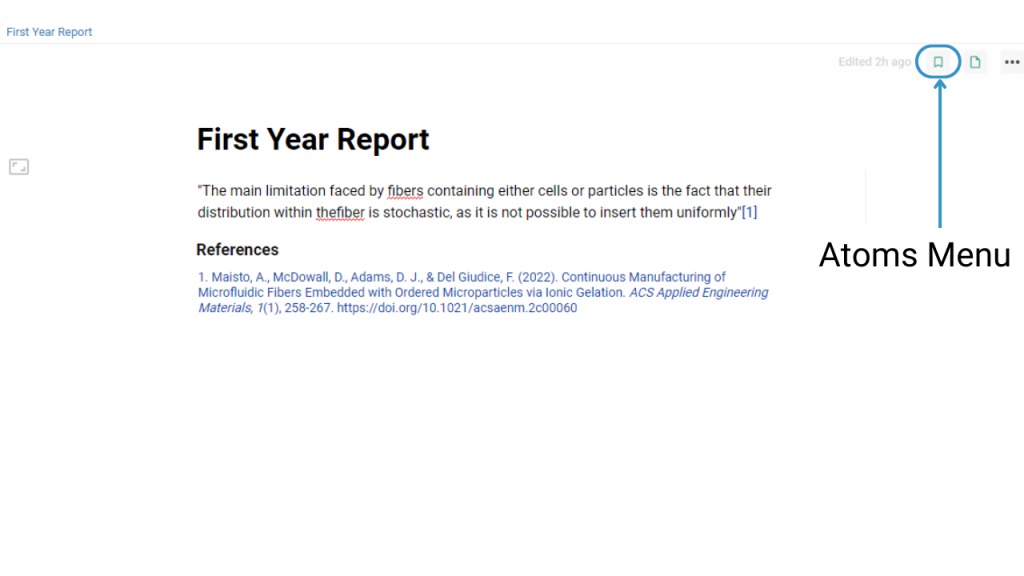
You can also view all the Atoms captured within a particular Paper when you have it open. Use the Atoms button on the top right of the screen to open the Atoms Menu. All the Atoms captured from the Page will display in a list here.
Finding your Atoms #
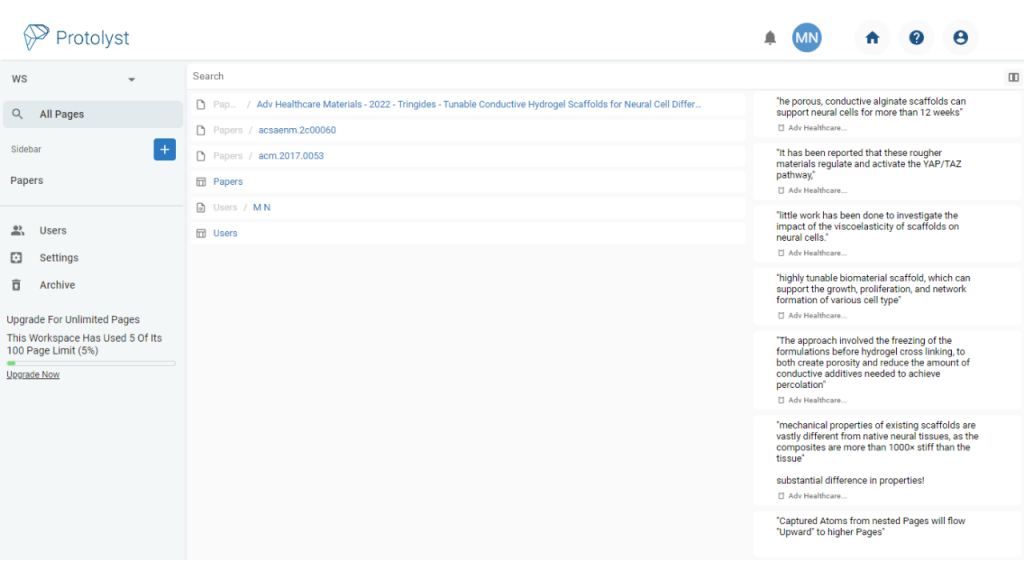
Now your highlights are saved as Atoms, they are accessible and viewable outside of the source file. You can browse through all your highlights in the Atoms column of a Table, without having to open each paper up separately. To search through all your Atoms from all of your Papers, you can use All Pages search, which will search by Keyword across your workspace, and help you locate a particular Atom.
Click on the Source Tag to view the Atom in the Source PDF. The Source Tag is a link between your Atom and it’s original location, it’s indicated by the Shield shaped icon next to the Page Title underneath your Atom in List View.
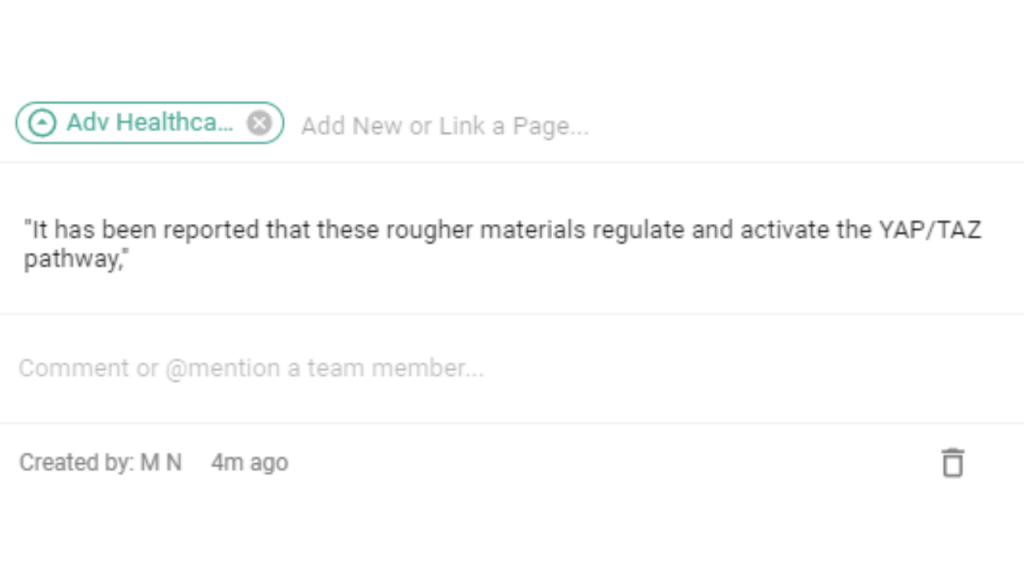
If you open up your Atom then the Source Tag is indicated by an encircled upward arrow in the Linking Bar area above your Atom Text.
Beginner Plus #
Organising notes from papers you are reading can fuel your research direction and also give you a headstart on academic writing. Here are some additional steps to help you with using your Atoms to write and how to make use of Citations and Referencing features on Protolyst.
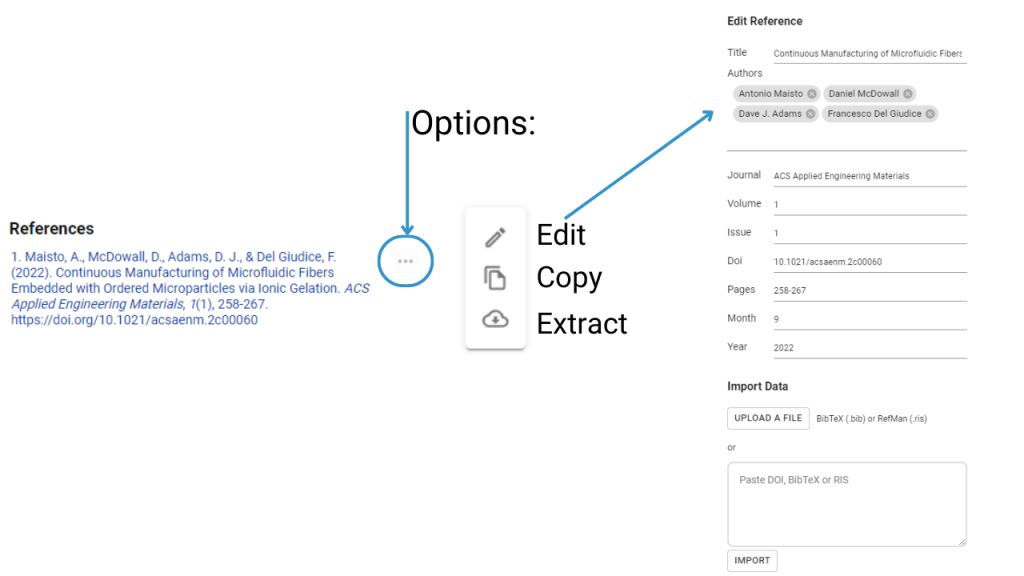
Automated Bibliography Information #
Reference information can be automatically extracted from papers you upload onto Protolyst. In your Table, you can add a Citations Property. When Papers are added into the Table, the Reference information will be automatically added here.
Reference Style can be editted in the Citations Property Options. Click the Property Title to open the Property Options, and then choose from the available referencing styles.
Let us know if there’s a style you want us to add!
Using Atoms from your Academic Reading #
Atoms can be added into Text Editor Pages, so you can use them in your writing. See how in 3 steps:
1 Add a New Page for your Written Piece
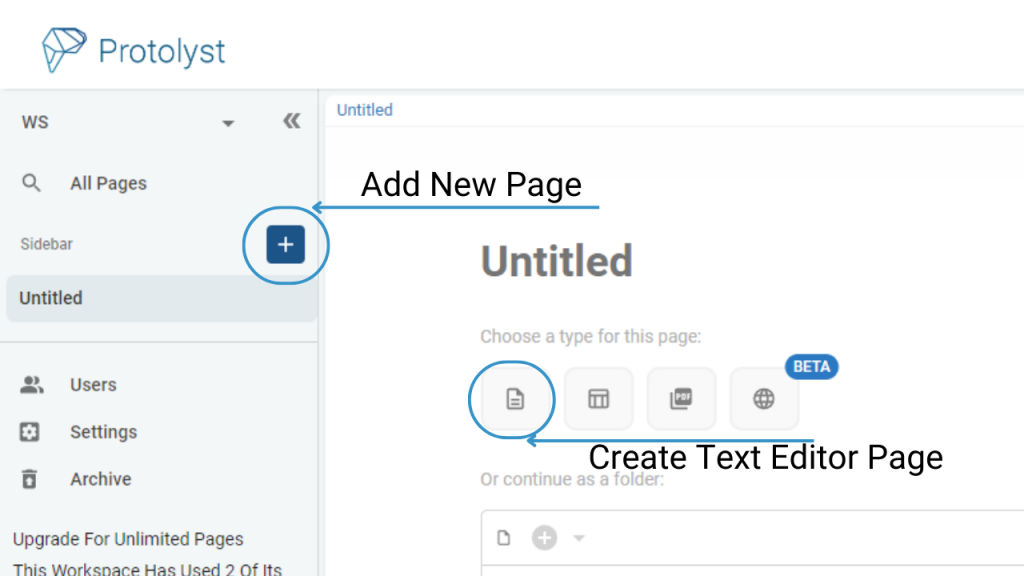
2 Open up your Papers Table in Split Screen
To open Pages side by side in Split Screen use ‘CTRL+Click’ on the second Page you want open. Alternatively you can right click on a Page and then select ‘Open in Splitscreen’ from the options that appear.
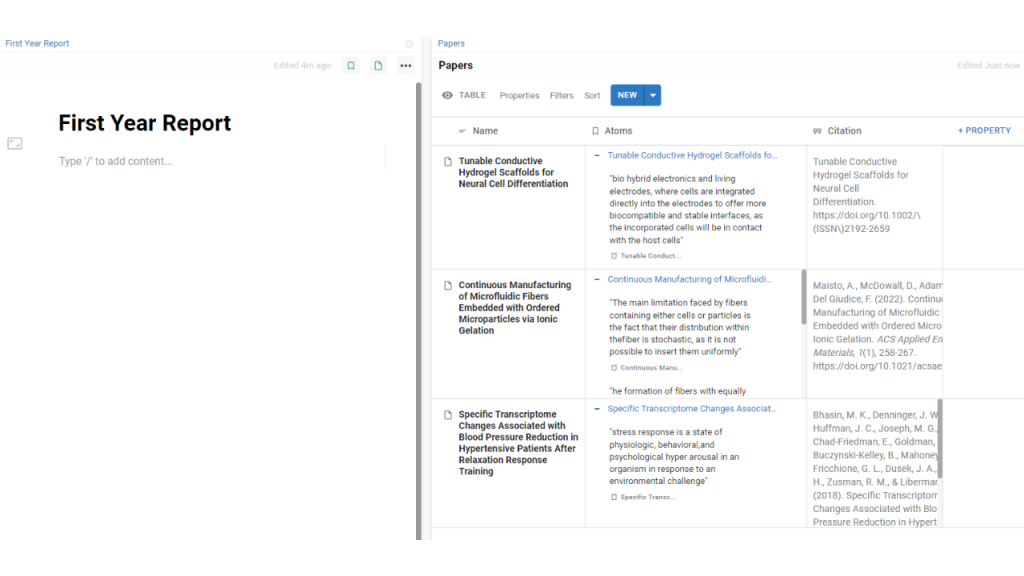
3 Drag and Drop Atoms from your Table into the Page
To use an Atom in your new Page, drag and drop your chosen Atom into your Page.
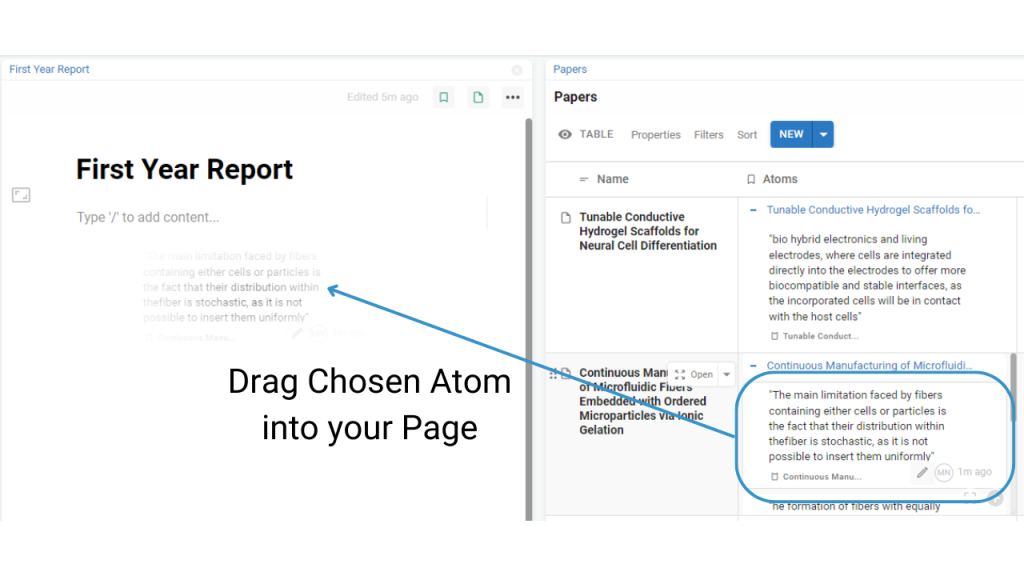
When you add an Atom into your Page, a numbered citation next to the Atom text appears. You can edit the Atom text to integrate it into your paragraph and write a flowing piece. This Citation links you directly to the original Atom in the Source PDF.
References Section #
When you drop your first Atom into the Page, a References Section will automatically appear at the bottom of your Page. This Section can be removed and the Referencing Style and Information can be edited to your preferences.
These additions allow you to start using the Atoms collected during your academic reading, to write referenced pieces, so you’re only ever one click away from the source information!
Academic Reading Workflow – Intermediate #
As you collect your highlights and save them as Atoms in your workspace, you may want to categorise them further by Research Themes, Structural Concepts or Specific Keywords. These further categories allow you to pool related information together from across your library of papers, so that you can unlock the knowledge acquired from your academic reading. With categories you can view a collection of Atoms relevant to a theme from many different sources.
On Protolyst you categorise your Atoms by adding Tags. To access and use Tags across your workspace, they should be set up as Pages in your Workspace.
Take the following steps from the Beginner workflow:
- create a Table
- upload your Papers into that Table
1 Create a Table for your Tags
Add a new Table into your Workspace and then add in your chosen Tags. These Tags should related to the information you want to remember from your academic reading. Tags could be Research Themes or Keywords like hydrogel, acoustics, gelation mechanisms, or Structural Concepts like Abstract, Methods, Key Results.
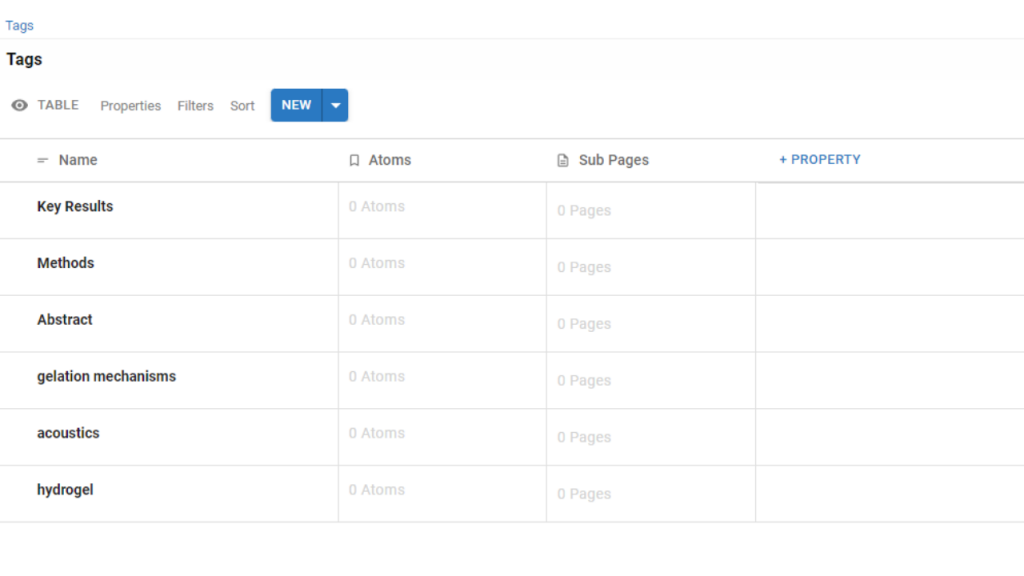
Add the Tags you would like to use to categorise your Atoms as rows in this Table
2 Capture Atoms as you read
Read your papers and highlight the important and interesting parts to save them as Atoms in your workspace.
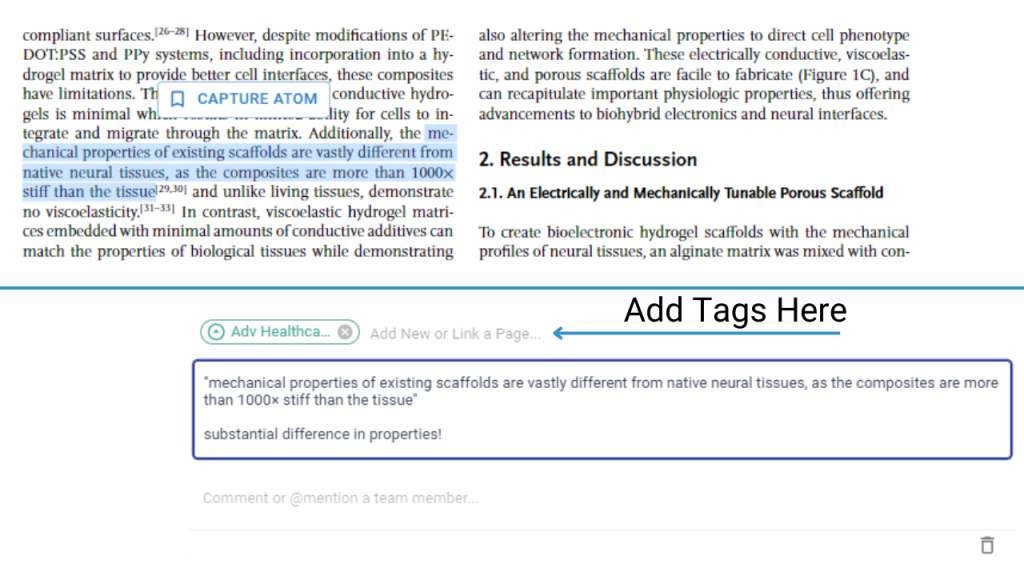
3 Add Tags to your Atom
After you hit ‘Capture Atom’ the Atom box appears. Here is where you add your Tags.
The Linking Bar is above the Atom text. A Source Tag has already been added when you captured your Atom and this links you back to the Atom’s Source Location in you academic reading list. Type in the Bar next to this Tag, and a list of all the Pages in your workspace will appear. Start typing the Tag Name or scroll to the Tags Table to select a Tag. Repeat for all the Tags you want to add to your Atom.
Your Atom will display for all of the Pages it has been Tagged to in your workspace.
4 In the Tags Table, the Atoms property will display all the Atoms that have been Tagged to each of your Tags.
Every Atom displays all it’s Tags, with the Source Tag first so you can always get back to the original source of your Atom.

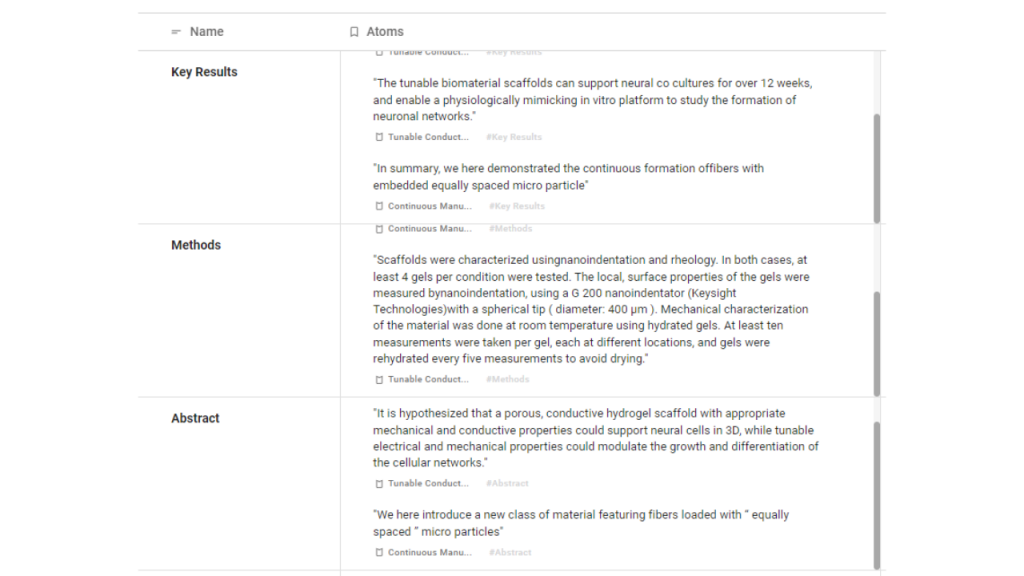
Atom Overviews #
You can use Atom Filters to separate out your Captured Atoms into a grid overview based on the different Tags that have been added. In this way you can see a breakdown of the Atoms collected by Keyword or Concept from each of your Papers.
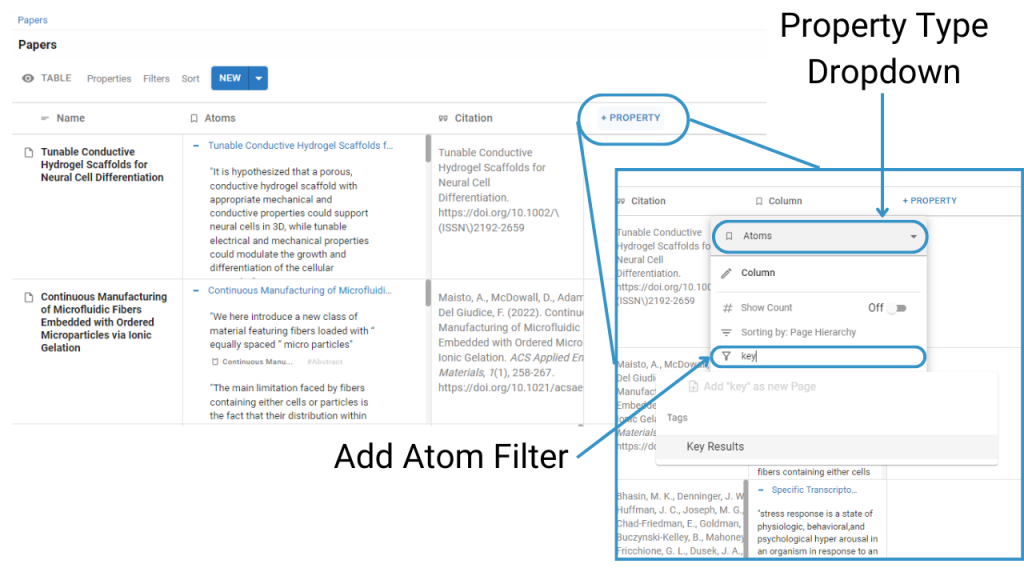
1 Add an Atoms Property to your Papers Table
Use the ‘+ Property’ option next to the last column on display in your Table to add a new Property
2 Add a Filter to the Atoms property,
Select one of your Tags as the Filter. Once added this will Filter all the Atoms to display only the Atoms that have been Tagged to the Filter Page such as Key Results.
3 Repeat for the Tags of interest
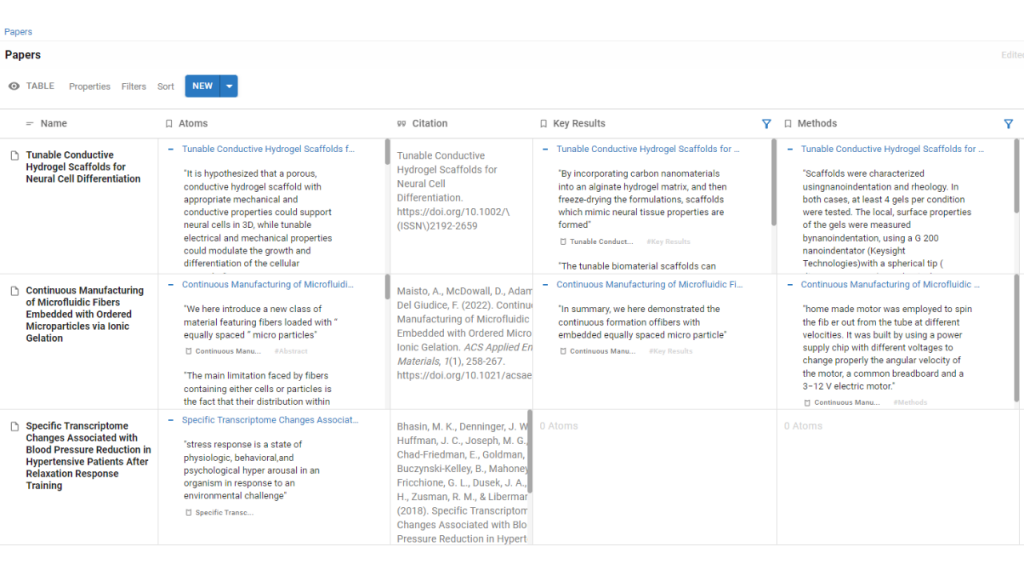
You can also add multiple Tags to a Filter to further refine the Atoms that display.
Table Views can be used to save different combinations of Properties so that you can quickly move between different information overviews, without having to update the Properties each time. These views allow you to see particular information inside all of the papers uploaded into your academic reading list.
Atom Import #
As you continue with your academic reading, you will build your collection of Atoms in your workspace.
To access and use collections of Atoms, you can Import them into New Pages in your workspace. Import will display all of the Atoms from a particular Page (Tag) in your workspace in the current Page.
To Import Atoms, open the Atom menu in the top right of a Page, and select the Add Atom Plus Button.
Select ‘Import Atoms from Page’ then select the desired Page. All of the Atoms of this Page will then appear in the Atom list for your current Page.
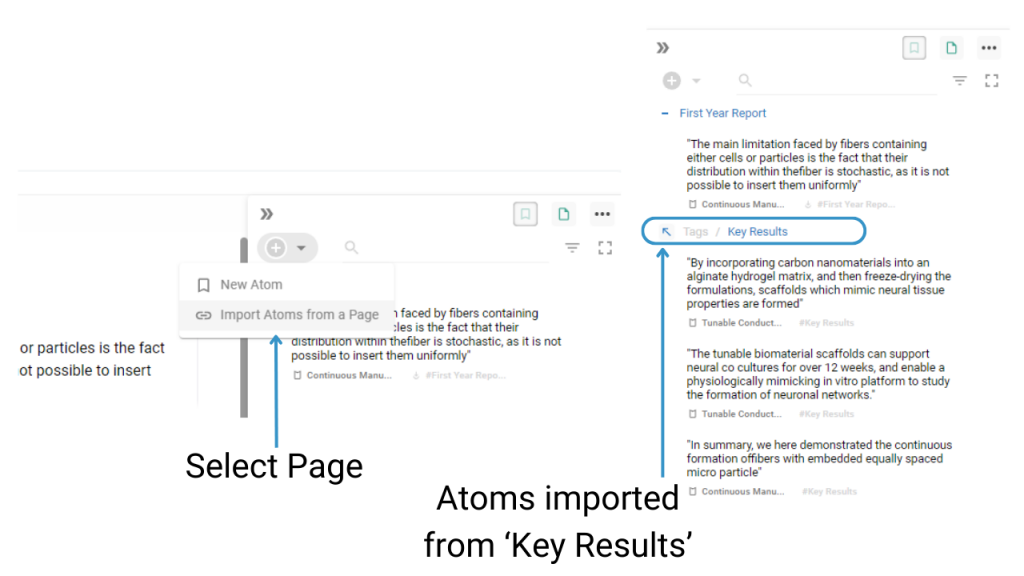
Using Atom import means you can access the Atoms you have already organised and want to use most from your entire library of academic reading, without using Splitscreen to browse them in your Table.


