Skip to content
Protolyst
  • Blog
  • Docs
  • Pricing
  • Login
  • GET STARTED

Quick Tips

  • Dark Mode
  • Splitscreen
  • Workspace Keyboard Shortcuts
  • Checklists
  • Renaming your Workspace
  • Download and Export
  • Equations
  • Searching your Workspace

Protolyst Portals

  • Portals
  • Portal Set Up
  • Adding Content to Portals

Protolyst for Research

  • How to Read a Research Paper
  • How to Build an Academic Reading System
  • Collecting and Organising Information from Research Papers
  • How to Write a Literature Review on Protolyst
  • Organising your Research Notes Efficiently on Protolyst
  • Academic Reading on Protolyst – Quick Start Guide

Protolyst for Organisation

  • Organising your To Dos on Protolyst
  • How to Manage Hiring & Recruitment on Protolyst
  • How to Write a Well Evidenced Essay, Fast
  • How to Write a Blog Post on Protolyst Using Your Atomic Knowledge Base

Protolyst for Notetaking

  • Technical Notetaking – Easily Add & Use Equations in your Notes
  • Note Taking on Protolyst
  • Cornell Notes for Notetaking on Protolyst
  • Simple First Zettelkasten on Protolyst
  • How to Research and Write an Article Fast on Protolyst

2. Connecting your Workspace

  • Viewing and Organising Atoms in Tables
  • Using Templates in Tables
  • How To Use Linked Tables
  • Create Pages From Atoms
  • Atom Inheritance in your Workspace
  • Moving your Files and using Folders on Protolyst
  • Using Tags on Protolyst
  • Connecting Atoms across your Workspace
  • Writing with your Atoms
  • How to Use Sub-Pages
  • How to Use Linked Pages

1. New to Protolyst

  • Simple Work Flow: Capturing and Using Atoms
  • 🚩Start Here
  • Download and Export
  • Capturing Atoms
  • Workspace Layout
  • Adding Information into your Workspace
  • Organising Pages in your Workspace
  • Create a Table
  • Table Views
  • Adding Citations & References to your Writing
  • Home
  • Docs
  • 1. New to Protolyst
  • Adding Information into your Workspace
View Categories

Adding Information into your Workspace

7 min read

To capture Atoms, you’ll need to have Sources of Information added into your workspace.

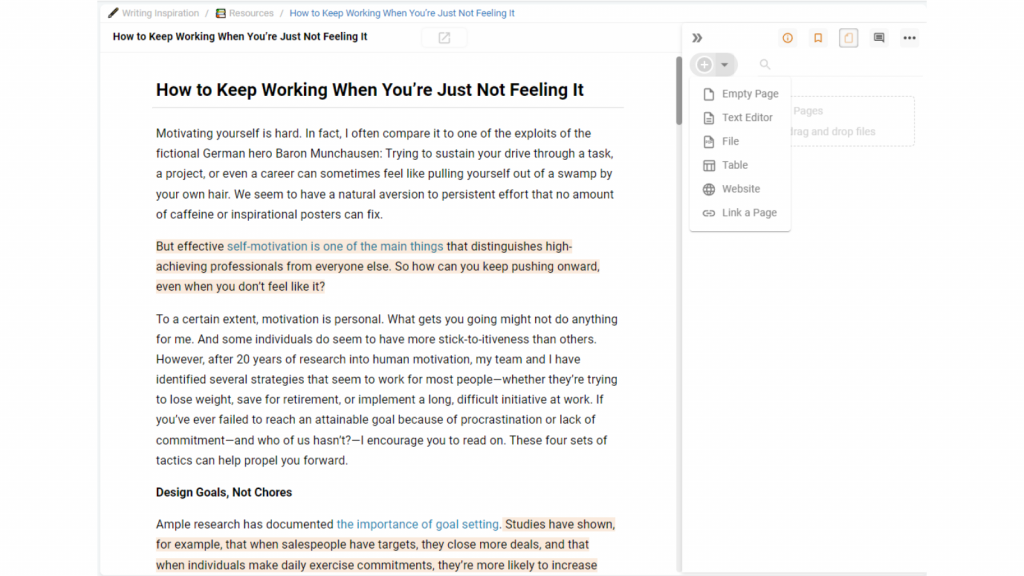
Any information you add into your workspace is added as a Page, and there are 4 different Page Types:

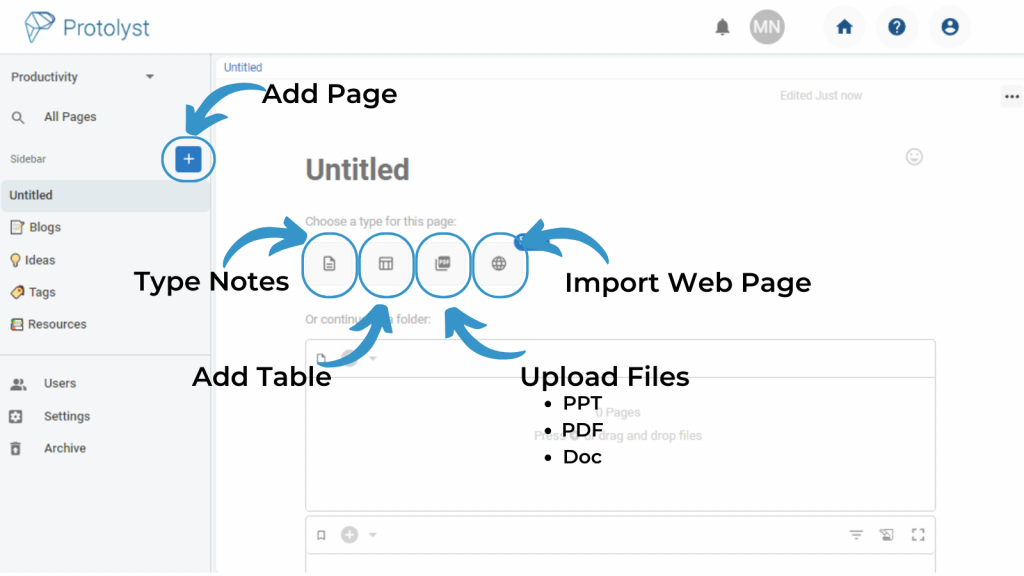
  • Text Editor – for your own typed notes
  • Tables – to organise your Pages and Information based on different properties
  • File Upload – add PPT, PDF and DOCs into your workspace
  • Web Page – import content from across the web via URL, including YouTube videos and transcripts!

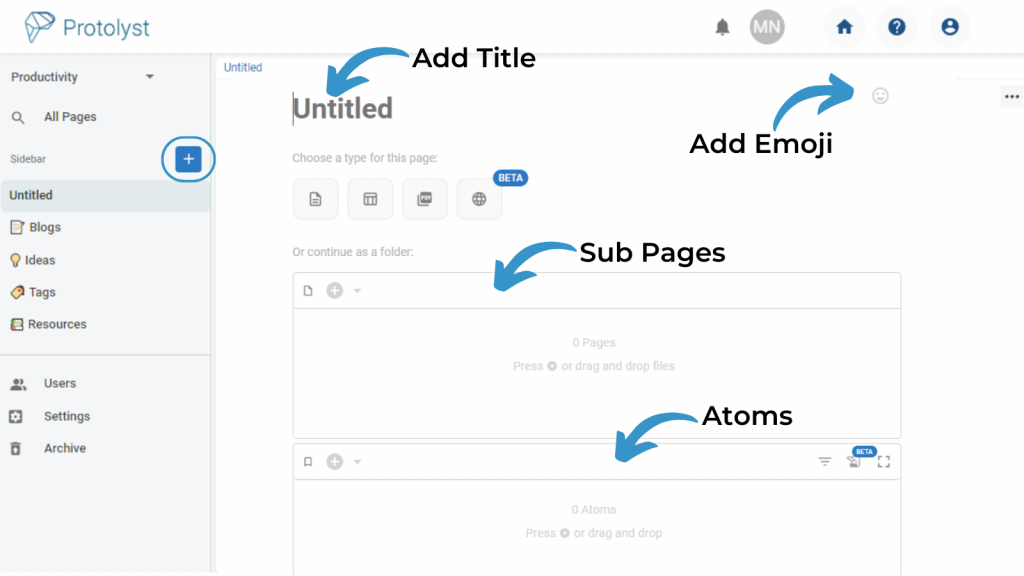
There are also Empty Pages, which are Pages that you create but don’t choose to set up as any particular Page Type. i.e. you don’t choose one of the above 4 Page Types. These Empty Pages are most often used for Tags in your work flows.

Add a New Page into your Workspace using the Blue Plus button in the top left of your workspace. Choose from the 4 available types or leave it ‘blank’ by not selecting one. Add your Title to the Page.

Adding a Page to your Workspace #

To add a new Page into your Workspace, use the Blue Plus Button on the top left of your Workspace. All New Pages added with this button are added into the Sidebar down the Left Hand Side of your Screen.

After adding a New Page, you’ll have a Page Setup Screen. You can add a Title, and choose a Page Type using the 4 buttons, and below that there are some further boxes for Atoms and Pages. These are useful for work flows you develop using Tags and for developing an Organisational System in your workspace, such as using a Page like a Folder.

Add Titles with optional Emojis for your Page. Under the 4 Page Type options, there are 2 boxes; Pages shows other Pages that sit underneath your current Page as Sub Pages and Atoms will display any Atoms connected to this Page

You can move the location of your Pages and add them into different locations in your workspace as you develop your organisational system.

Adding Multiple Pages into your Workspace #

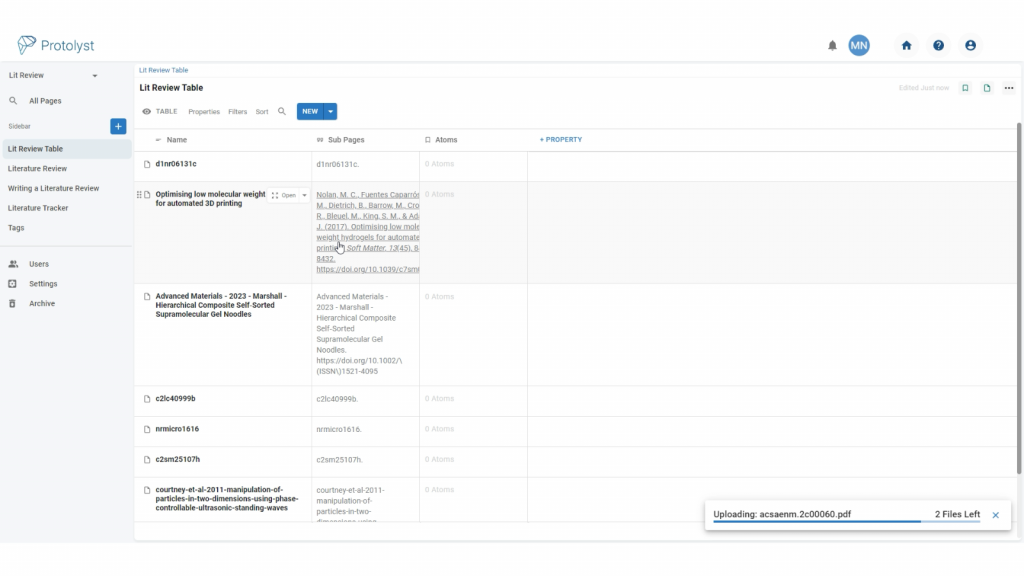
You can batch upload several sources you already have on your computer into a Table. The File Types supported that you can then view and Capture Atoms from in Protolyst include PDF, DOC and PPT.

Add a New Page and select Table type. To upload your Sources into this Table, drag and drop them from your computer onto this Table. They’ll upload with each File as it’s own Row in your Table.

Drag and drop a selection of Files onto a Table to batch upload. They’ll populate the table one file per row and a progress bar will appear in the bottom right of the screen. This Screenshot comes from a Literature Review work flow and uses a Citations Property to grab referencing information.

Importing your Information #

We are working on integrations to upload your information into Protolyst. While these are in development, we’re happy to help you with moving your information if you drop us a message.

Page Types #

Let’s look at each Page Type in further Detail:

Text Editor Pages #

Text Editor Pages let you add in your own typed notes. Once Text Editor is chosen, you’ll have a Text Section ready to start typing into.

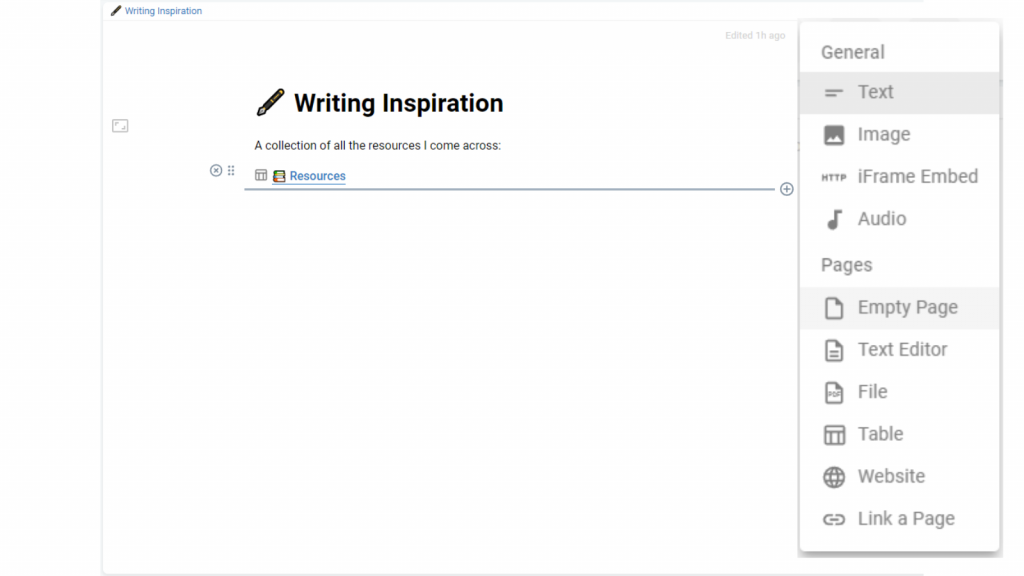
These Pages also support different media like Images, Video and Audio. To add these into the Page you can add a new Section into your Page.

Hover at the bottom of your Text Section, and a + option will appear, click to open up the Section Menu, which lists all the different Sections you can add into your Page.

A Text Editor Page. The first text section has been populated. To open the Section Menu (outlined in blue above) hover at the bottom of the Section and click when the line and plus icon appear.

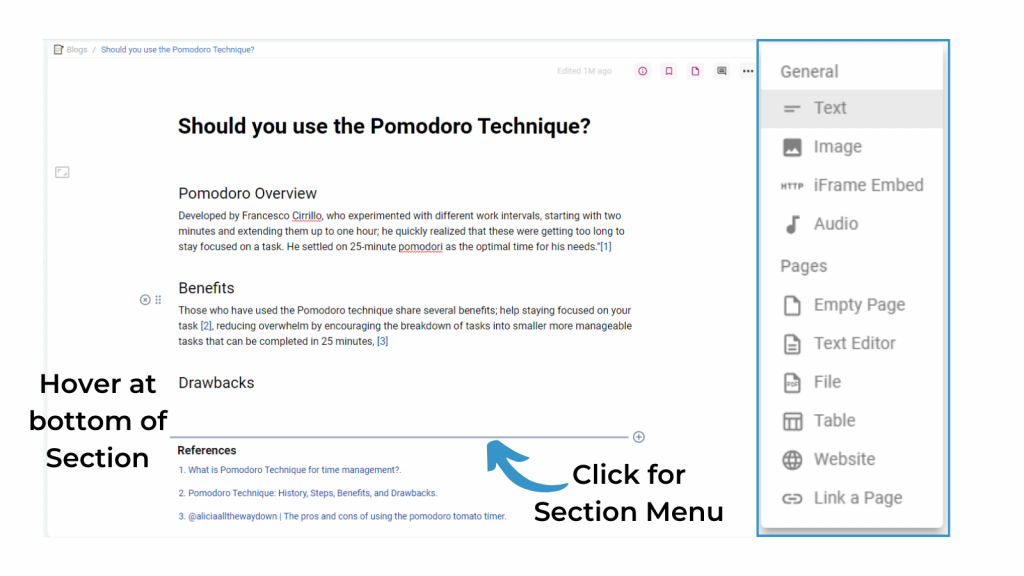
The top half of this Menu gives you options to add different types of multimedia content alongside your Typed Notes.

The bottom half of this menu gives options for you to add new Pages or add a link to connect this page to other existing Pages in your Workspace.

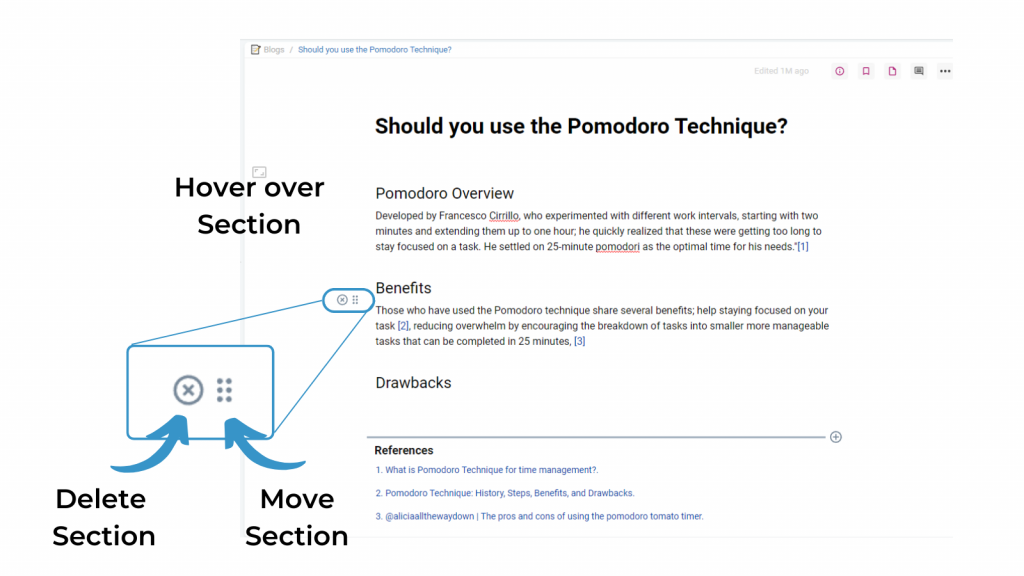
You can reorganise the Sections of your Page once added with drag and drop. Hover over a section until the 6 dot button and a circled cross appear on the left of that section. Grab the 6 dots and drag to move that Section.

You can also use these Page Sections to build dashboards.
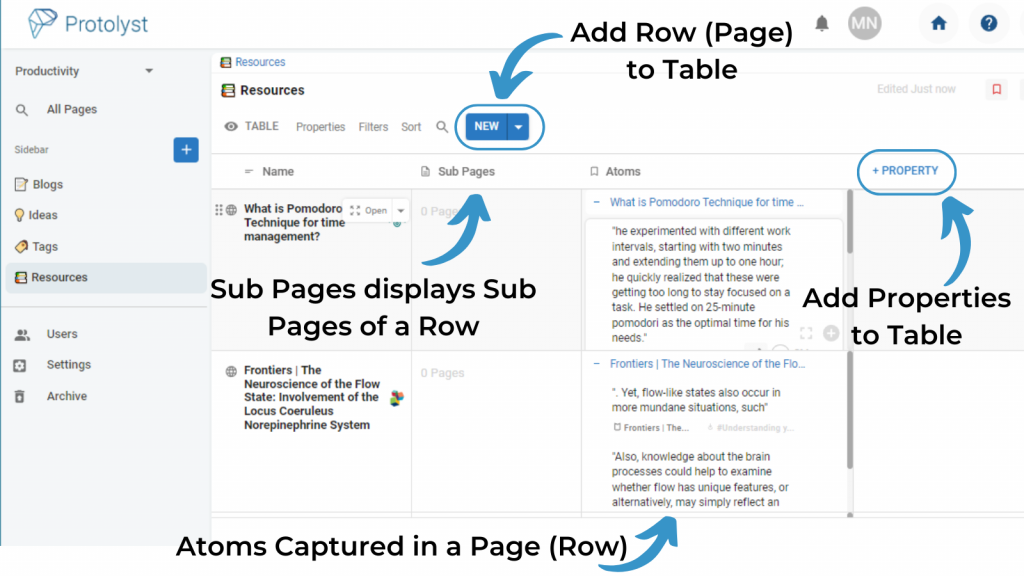
Table Pages #

Tables are databases and let you organise a collection of Pages based on different Properties. Every Row of your Table is a Page in Protolyst (i.e. it can be a Text Editor, File, Web Page or even another Table). You can also leave your Page ‘Empty’ so it operates similarly to a Row in a Spreadsheet.

The Atoms and Sub Pages Properties in Tables let you see the important information and other Pages in your workspace more easily.

An Overview of Tables. All Tables are created with Name, Sub Pages and Atoms properties by default. You can add further Properties to a Table using the Add Property button, and add New Rows into a Table using the New Button above the Table

There are different Property Types you can add to organise your Tables, and then you can apply different Filters and Sorts to display information that meets particular criteria. You can also display and view the information in your Tables in several ways by creating Table Views, and make use of Templates to add Notes following a Particular Format.

For more information on using Tables to organise papers and literature, take a look at our research work flows:

  • Literature Review
  • Organising Notes on Papers
  • Write an Article Fast

These flows could also give you some inspiration on using your workspace for collecting and organising information from a group of Sources.

File Upload Pages #

On selecting ‘File Upload’ type you’ll be prompted to select a file to upload from your computer. File types supported include .DOC, .PPT and .PDF

To batch upload multiple Files (see above), create a Table to ‘hold’ all your Files, and then drag and drop the selection of Files from your Computer onto the Table. They’ll upload into the Table, one file per row.

Web Page Import Pages (Beta) #

Selecting ‘Web Page’ will prompt you to paste a URL for import. Our importer will then extract text content from that web page and add it into your workspace

On Selecting Web Page Type, you will be prompted to paste a URL to scrape the content from to add it into your workspace

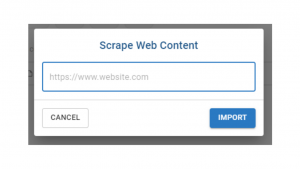
If you paste a YouTube Video link, a transcript will be generated alongside the video player in the page.

Example YouTube url import showing a video player and accompanying transcript.

This Page Type is currently in Beta so let us know how the importing goes with the feedback options!
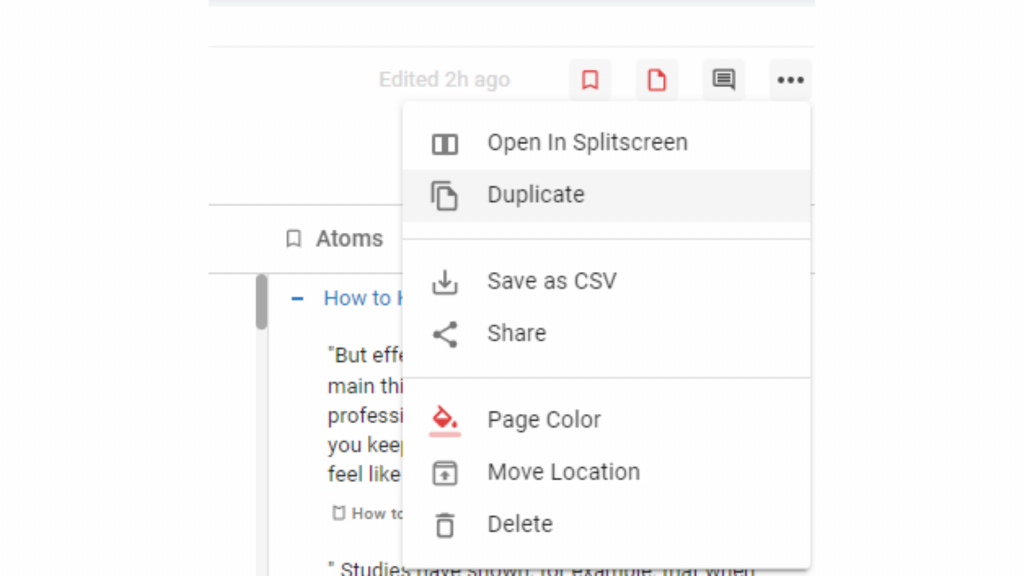
Copying a Page #

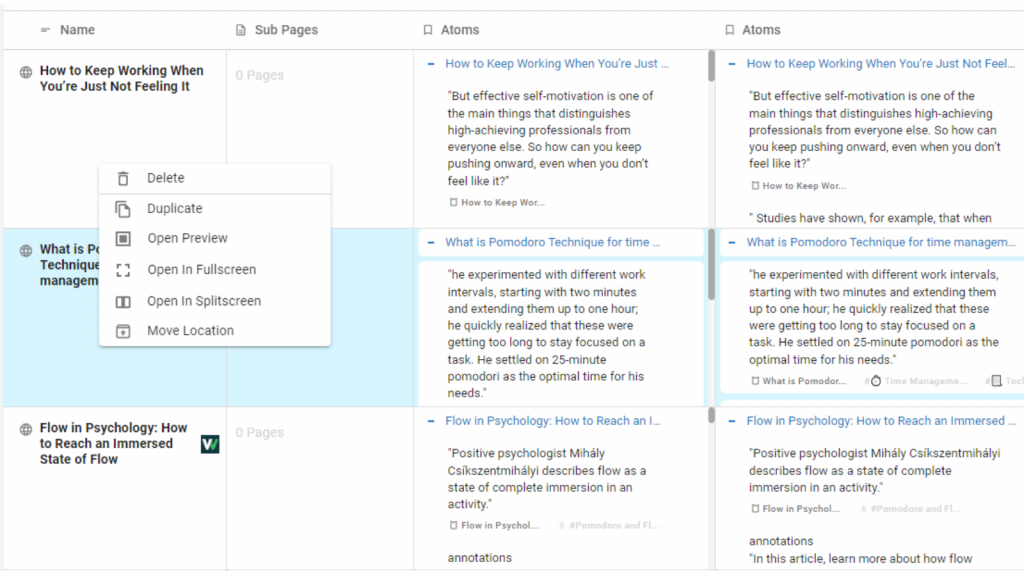
You can duplicate any of the Pages in your workspace. Use the Page Options (right click on a Row of a Table, open the Page Options Menu) and choose ‘Duplicate’ to create a Copy of your Page.

Hover on a Page and open the Page Options Menu by clicking the 3 dot button.

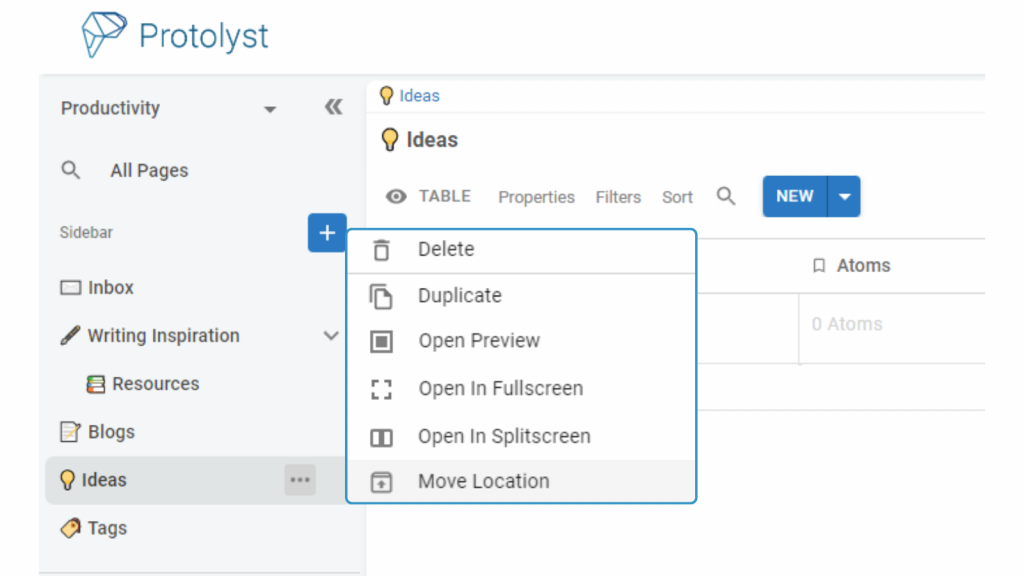
When your Page is open you can also use the Page Options Menu (3 dot button) in top right of the page.

In an Open Page, open the Page Options Menu using the 3 dot button in the top right of the screen

You can also duplicate a Row in your Table by right clicking on the Row and choosing ‘Duplicate’

Right click on a Row of a table to access the Page Options

Deleting a Page #

To delete a Page in your workspace, open the Page and then open the Page Options Menu in the top right of the Page. Select Delete from the available options. This will send your Page to your Workspace Archive.

You can also delete a Page from the Sidebar. Hover over the Page and select the 3 dot Page Options button and then choose ‘Delete’ from the options.

In Tables, right click the Row to access the Page Options and select ‘Delete’. You can select multiple rows with Ctrl+Click to delete several Rows from a Table at once.

Adding Pages Outside of the Sidebar #

Once you have set up your workspace, you may want to add Pages in different places, rather than adding them into the sidebar with the Blue Plus Button.

In Text Editor Pages, you can add New Pages through the Add Section Menu and selecting – Add New Page. This will add your new Page as a Sub Page of your current Page.

Add New Pages as Sub Pages of a Text Editor Page through the Add Section menu. Hover at the bottom of a Section and click when the line and plus icon appear to open the Menu. Choose a Page Type from the Options to add a New Page.

You can also use shortcuts to add a New Page. Type / in a text section and then choose Add New Page from the dropdown list of Options that appear.

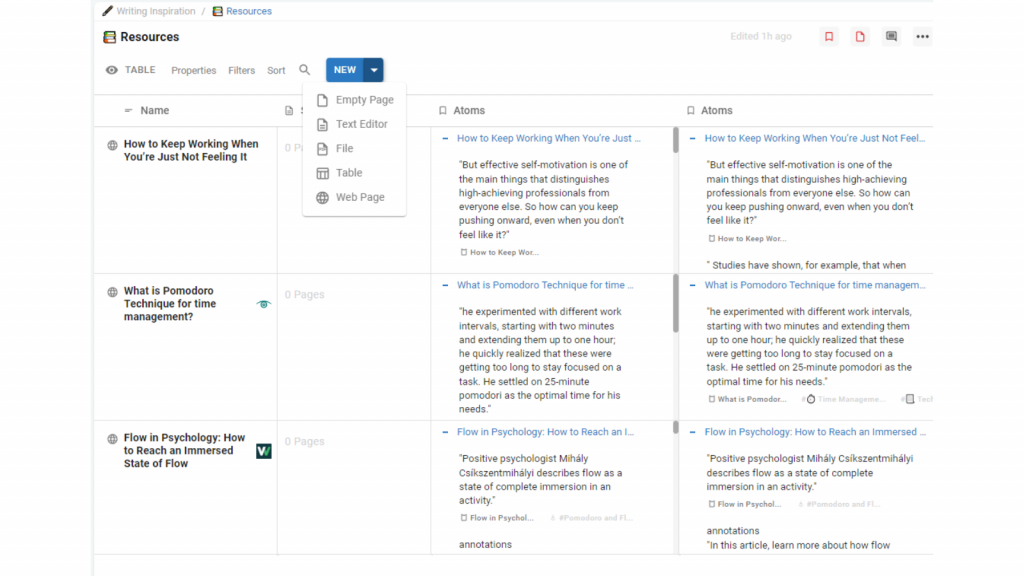
In Tables New Rows can be added using the New button above the Table. Use the dropdown to select the Page Type you want to add as a Row to your Table

Add New Pages (Rows) to a Table using the New button above the Table and choose a Page Type

In File and Web Page Pages, you can add Sub Pages through the Pages Menu. Open the Pages Menu in the Top Right of the Page and then use the Plus Button to add a new Page into your workspace.

Expand the Pages Menu using the Icon in the Top Right of the page, then use the Plus Button to add a Sub Page to this Page.

In Empty Pages, you can use the Plus Button in the Pages Section to add a New Page as a Sub Page of your Current Page

Add Sub Pages to an Empty Page using the Plus Button in the Pages Section of that Page. Choose the Page Type to add a new Page.
What are your Feelings
Share This Article :
  • Facebook
  • X
  • LinkedIn
  • Pinterest
Still stuck? How can we help?

How can we help?

Updated on January 24, 2024

Powered by BetterDocs

Table of Contents
  • Adding a Page to your Workspace
  • Adding Multiple Pages into your Workspace
  • Importing your Information
  • Page Types
    • Text Editor Pages
    • Table Pages
    • File Upload Pages
    • Web Page Import Pages (Beta)
  • Copying a Page
  • Deleting a Page
  • Adding Pages Outside of the Sidebar
About

You're wasting 1 day a week refinding the golden nuggets of info buried in your files and folders. Protolyst is a networked note taking web app where you can collect and categorise each individual highlight to find and use your most valuable info fast.

Site
  • Docs
  • Blog
  • Pricing
  • Cookie Policy
  • Privacy Policy

Use For

  • Writing Referenced Articles Fast
  • Writing a Literature Review
  • Taking Notes on Research Papers
  • Building a Literature Database
  • Zettelkasten Notetaking System
  • Connecting Cornell Notes
We use cookies on our website to give you the most relevant experience by remembering your preferences and repeat visits. By clicking “Accept All”, you consent to the use of ALL the cookies. However, you may visit "Cookie Settings" to provide a controlled consent.
Cookie SettingsAccept All
Manage consent

Privacy Overview

This website uses cookies to improve your experience while you navigate through the website. Out of these, the cookies that are categorized as necessary are stored on your browser as they are essential for the working of basic functionalities of the website. We also use third-party cookies that help us analyze and understand how you use this website. These cookies will be stored in your browser only with your consent. You also have the option to opt-out of these cookies. But opting out of some of these cookies may affect your browsing experience.
Necessary
Always Enabled
Necessary cookies are absolutely essential for the website to function properly. These cookies ensure basic functionalities and security features of the website, anonymously.
CookieDurationDescription
cookielawinfo-checkbox-analytics11 monthsThis cookie is set by GDPR Cookie Consent plugin. The cookie is used to store the user consent for the cookies in the category "Analytics".
cookielawinfo-checkbox-functional11 monthsThe cookie is set by GDPR cookie consent to record the user consent for the cookies in the category "Functional".
cookielawinfo-checkbox-necessary11 monthsThis cookie is set by GDPR Cookie Consent plugin. The cookies is used to store the user consent for the cookies in the category "Necessary".
cookielawinfo-checkbox-others11 monthsThis cookie is set by GDPR Cookie Consent plugin. The cookie is used to store the user consent for the cookies in the category "Other.
cookielawinfo-checkbox-performance11 monthsThis cookie is set by GDPR Cookie Consent plugin. The cookie is used to store the user consent for the cookies in the category "Performance".
viewed_cookie_policy11 monthsThe cookie is set by the GDPR Cookie Consent plugin and is used to store whether or not user has consented to the use of cookies. It does not store any personal data.
Functional
Functional cookies help to perform certain functionalities like sharing the content of the website on social media platforms, collect feedbacks, and other third-party features.
Performance
Performance cookies are used to understand and analyze the key performance indexes of the website which helps in delivering a better user experience for the visitors.
Analytics
Analytical cookies are used to understand how visitors interact with the website. These cookies help provide information on metrics the number of visitors, bounce rate, traffic source, etc.
Advertisement
Advertisement cookies are used to provide visitors with relevant ads and marketing campaigns. These cookies track visitors across websites and collect information to provide customized ads.
Others
Other uncategorized cookies are those that are being analyzed and have not been classified into a category as yet.
SAVE & ACCEPT