Much like Workspaces, Portals are made from Pages and Tables. These can be edited by Admins and Contributors, and then when ready Published for your Participants to view and interact with.
Publishing #
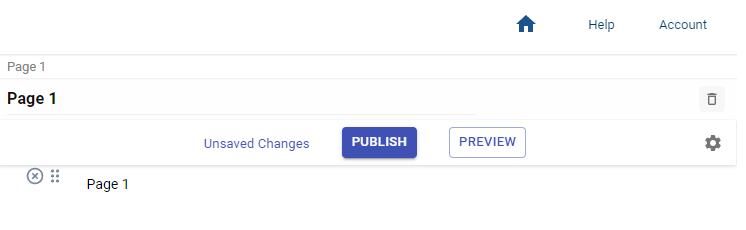
To make your content live for the Participants of your portal, you must hit Publish at the top of each page.
At the top of every page are Publish and Preview buttons to see what your content looks like to a Portal participant and to make the Current Page live for your participants to view.
Pages #
Pages are home to your written, visual and interactive content, similar to Pages in Workspaces
You can edit pages before publishing them for your invited participants to view and interact with.
Adding Pages #
Add pages by clicking the + button at the top of the left sidebar. Name your page by typing in the highlighted input.
A new page will present you with three buttons to create your page:
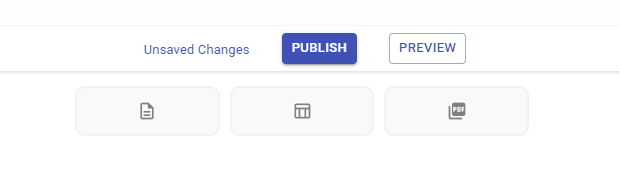
- Page icon creates a page for you to edit and add sections too
- Table grid icon creates a Table
- PDF allows you to upload PDF documents
Navigating Pages #
By default New Pages will be added into your Sidebar
Navigate between pages by clicking their name in the sidebar.
Delete a page by hovering over its name in the sidebar and clicking the 3 dots …
Alternatively, click the delete icon in the top right of the page header.
Rename a page by clicking it’s name in the top left of the header.
Customising Pages #
You can add different content into a Page, by following the same process for adding different sections to a Page in a Workspace.
In Portals there are further sections that can be added:
- Forms – to capture various inputs from participants
- Quizzes – to add in questions to test participants
N.B. When Participants are invited to a Portal, they each have their own instance or individual unique version of that Portal. So any Pages with sections that ask for inputs and for users to add their own content will be unique to each User.
Forms #
Forms can be used to capture information from your Portal Participants. When your Participants submit information through the form, you will see it appear in the corresponding Table.
The Users Table appears in every Portal Project and can be used as the Table to connect to your Forms. Alternatively you can create a Table that sits elsewhere within the Portal.
On selecting Form Section when adding a new Section to a Page, you will be prompted to select a Workspace – choose the current Portal Project – and then select a Table – choose the Users Table.
Once a Table is selected, it will display all the existing Properties, which you can select or deselect to appear in the Form. To add the Form select ‘Add Form’ at the bottom of the pop up menu.
There’ is a Gear Icon in the top left of the Form. This will open up the Properties list where there is an option to ‘Add Property’ to add further questions into your form.
You can add further Properties to add different Questions and Sections into your Form here or once the Form has been added
When Participants submit the Form, all their answers will populate into the corresponding Table and Properties.
n.b. If you are collecting personal or sensitive data and connecting to a Table inside your Portal, be careful that this table doesn’t get published and display to Participants as part of your Portal!
Adding Quizzes to a Page #
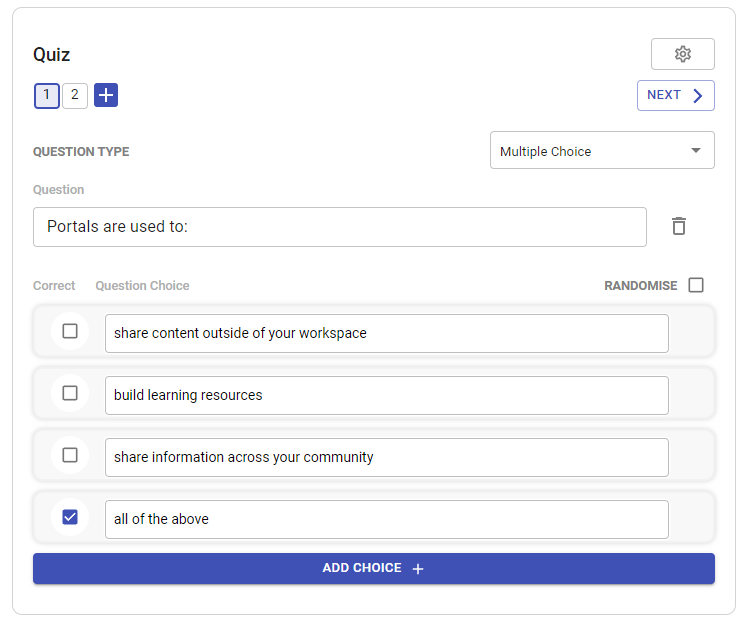
Quiz sections display questions which, upon publishing a page, project participants are able to interactive with and complete.
There are different types of quiz questions available:
- Multiple Choice – add a number of different options for participants to choose from
- True or False
- Text Input – submit a written answer
- Drag N Drop – participants must drag options into a particular order
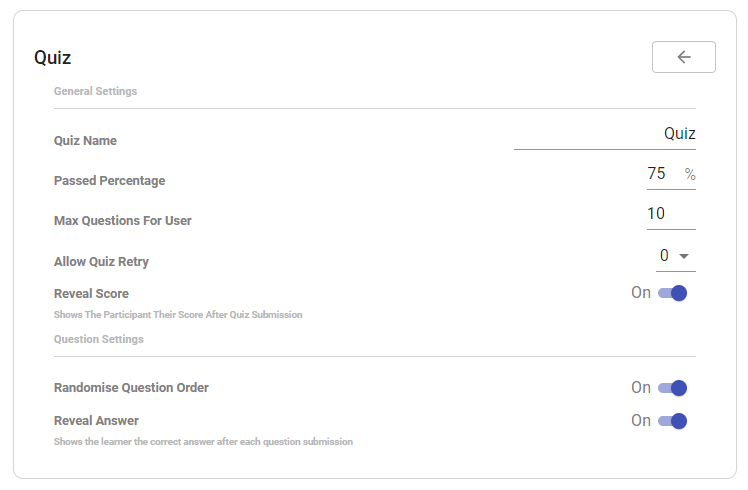
Once created, there are various settings to customise the Quiz and experience for your Participants
- Quiz Name
- Pass Percentage
- Max Questions per User
- Number of Attempts
- Reveal/Hide Participant Score
- Randomise Question Order
- Reveal/Hide Answers
Participant scores and answers to quizzes can be viewed in the Users Table, by adding a New Property and selecting Quiz Result and the corresponding Quiz (if there are multiple in your Portal).
Quizzes give you more limited insight into the responses of your Participants, displaying an overall Quiz score.
While quiz creation is collaborative, quizzes are completed on a participant by participant basis.
Reorganising Pages #
Your Pages can be reorganised in the Sidebar using Drag and Drop.
Pages can be nested under each other to give further organisation. Use the Arrow to the right of the Page name to expand it and drop the other Page in.
Expanding the drop down displays all the Pages nested under the Top Level Page in your Sidebar.
Tables #
Adding Tables into a Portal works exactly like adding Tables to a Workspace. Create Tables and add Properties, set up Sorts and Filters, and create different Table Views.
Tables added will each have their own Publish button, as there are further settings for you to apply to customise how your Participants view and interact with a Table and it’s contents.
Tables can be created as a New Page or Section of a Page. Tables already created in a Portal, can also be embedded as a Section of a Page, through the Link a Page option.
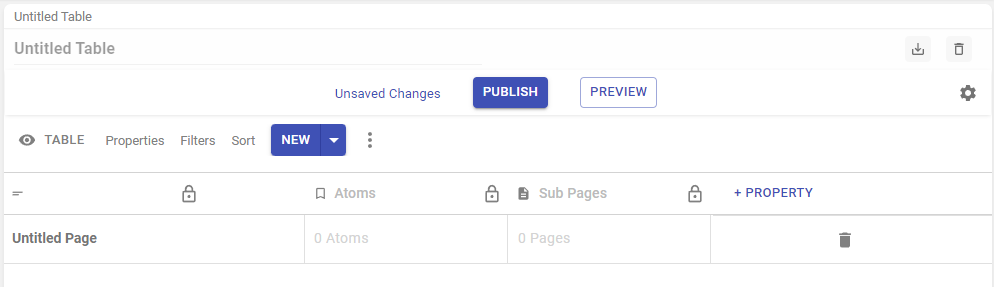
Table Settings #
When a Table is added, a Menu will appear above it. There is a Gear Icon in the top right corner to access Settings for the Table with a first option to set the table to be Read Only or Editable by Participants.
When set to Read Only, each Property also has an additional padlock icon next to each Property Title. Clicking on the Property, you can then set whether the particular column is read/write for a Participant . This gives you some flexibility in selecting particular fields that your Participants can edit in a Table.
Setting Table Features for Users #
You can also set up Tables to give your Users access to different features to develop the Table such as:
- adding new rows
- adding new properties
- changing the Filters, Sorts
These options can be set to display or be made unavailable to your users through the three dot menu above the Table grid.


